Pages

Thursday 17 March 2022

Sewing room tour

This week an article about my sewing room was posted on the Bernina Benelux blog It's in Dutch, and since Google Translate has the habit of throwing all kinds of oddities in the mix when translating sewing terminology, I thought it would be a good idea to share an English version on my blog.

So here it is, a long overdue post with snippets of what I've been up to recently.


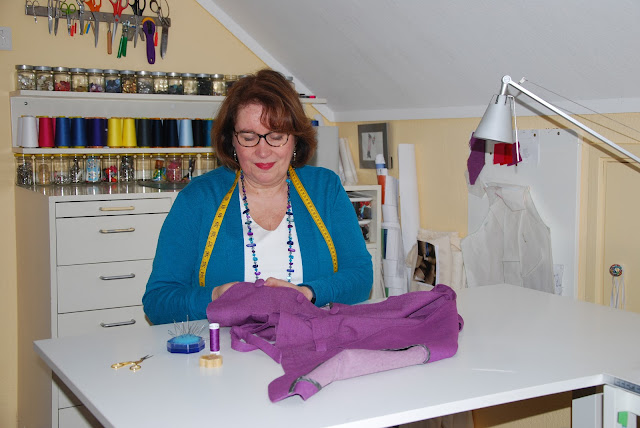
Hi! I’m Marianne, born in 1957 and dressmaker since 1977. It started with hippie dresses during my days at Uni, followed by power suits and a wedding dress in the 80s, baby clothes, children's wardrobes and later prom dresses for my daughters. Each phase presented new creative challenges. Now I mainly sew for myself again. My favourites? Beautiful, challenging patterns with elaborate details. It's wonderful to see the image you have in your head slowly become reality! These days I mainly post my works in progress and finished garments on Instagram (@foxglovesandthimbles)


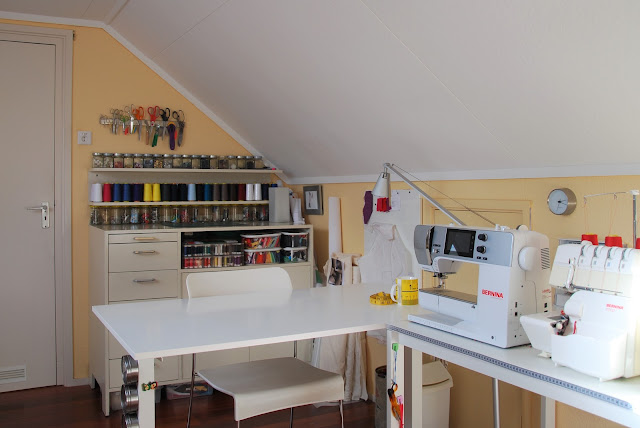
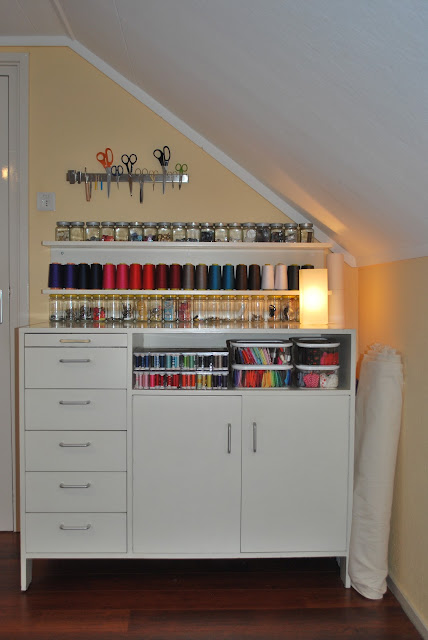
For years, the kitchen table was my workplace. My sewing machine was in the china cabinet, the fabrics and haberdashery were in the attic. When I set up a dedicated sewing room as an empty nester, it was my priority to store everything as organised as possible. My sewing room is under the sloping roof, there is no room for tall cabinets. The most important piece of furniture is an old baby dresser, made by my father during my first pregnancy. That baby dresser is packed with fabrics and haberdashery. Both in the open compartments and on top yarn, ribbons, buttons. On the wall above hangs a magnetic strip for storing scissors and other tools. It's incredible how much you can store on a surface measuring just 60 x 120 cm!


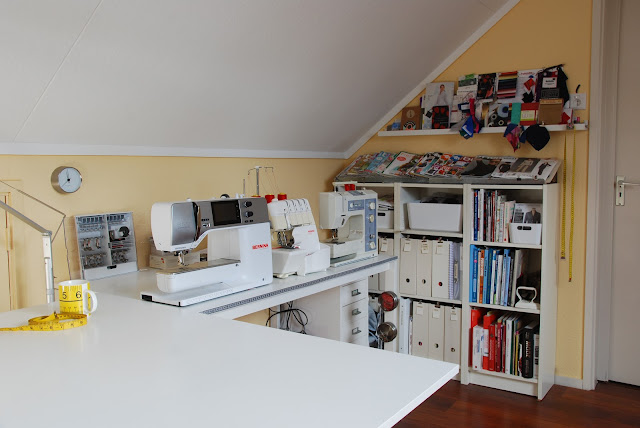
Across the room there are three low bookcases filled with patterns, pattern magazines and sewing books. Shoe shelves are mounted on top so I can display the latest magazines and patterns. Under the shoe shelves there is storage space for rulers and tracing paper, above the bookcases there's a picture shelf with a few magnetic boards for inspiration pictures and fabric swatches.


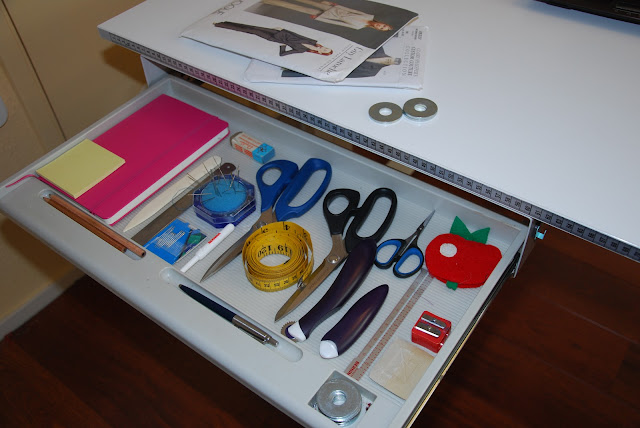
 I have two tables in a L-shaped set up. A standard table for the machines, a sit/stand desk for hand sewing, pinning and basting. By using a hand crank that table easily changes to cutting table height for tracing, pattern drafting or cutting fabrics. Magnetic storage boxes and hooks for small tools hang from the metal legs. An old keyboard tray is mounted under the top. Perfect for having everything within reach and still keeping your worktop empty.


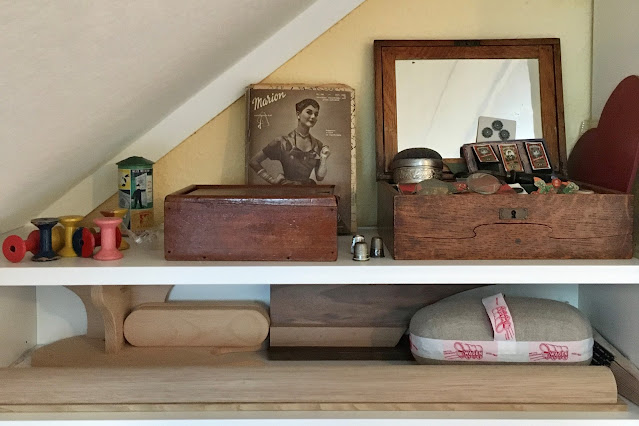
All furniture is kept white, to create a neutral backdrop. Older elements have been added here and there, such as my grandmother's sewing box, vintage sewing magazines from the year I was born and the painted thread spools I played with as a child.


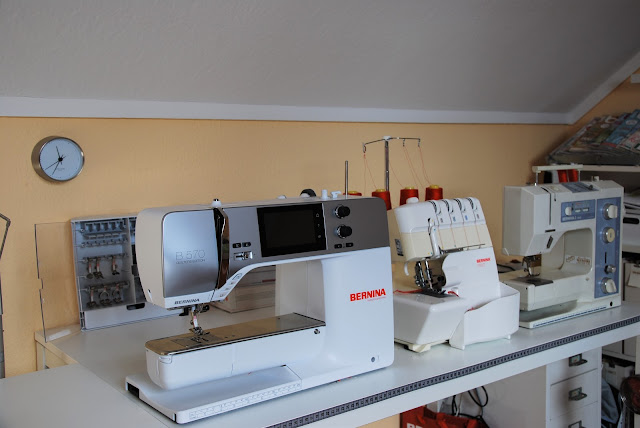
I have three machines. A Bernina 570 QE, a Bernina 1100D overlocker and a Bernina 1030. For the first ten years of my sewing career (including the wedding dress!) I worked with a heavy, noisy machine found next to a garbage bin. It was blessed with the subtlety of a bulldozer. Buying my first Bernina made such a huge difference that I was sold on the brand for life. A favourite? I once said that in the event of a fire, I would run to save the 1030 first. After all, it's my first love. But I wouldn't miss the other two for the world!


What does your dream sewing room look like?
My dream sewing room is a room where everything has a fixed place and you can find things with your eyes closed. The size of that room is less important, the organization level all the more. For me, the trick is to find (and keep) a good balance between the available space and the amount of stuff you drag into it. It's an ongoing battle to ensure that the doors of the fabric cabinet can still close and the number of patterns remains within limits. Sometimes tough choices have to be made in order to keep my room free of clutter and prevent overflowing drawers. But creating my dream workspace is worth it!


Big projects or quick projects?
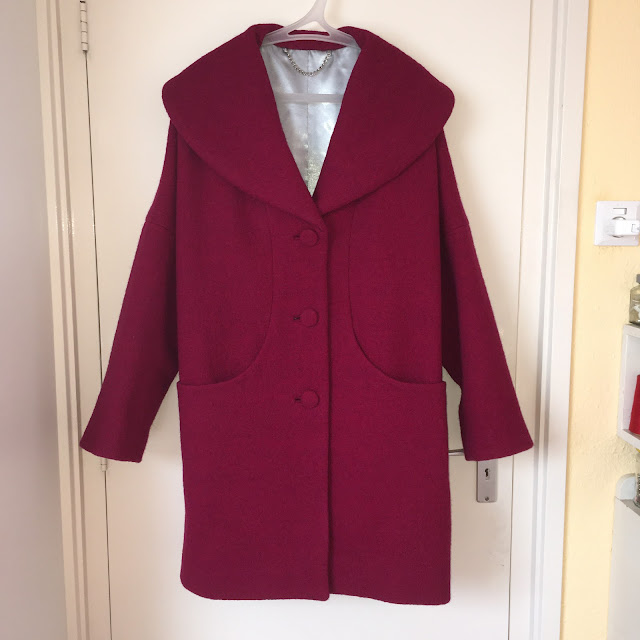
Big and captivating please! During the first lockdown I found distraction in making a winter coat. Tailored, using horsehair canvas, a pad stitched collar, bound buttonholes. The kind of project I find it hard to walk away from once the last stitch is made. 


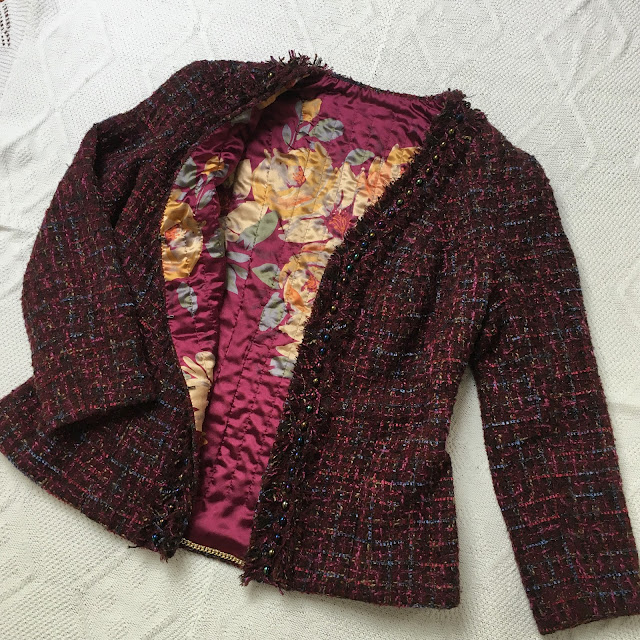
During the next lockdown I worked on a Chanel-style jacket, made with traditional couture techniques. Quilting loosely woven bouclé and silk, using the Bernina walking foot #50. I spent a total of 124 hours on this jacket and loved every minute of it.


Do you mostly sew during the day or at night?
That depends on the season. During summer I spend a lot of time gardening in the cutting garden and mostly sew on rainy days. I often get the best ideas in the middle of the night. Because sewing projects also come along in my sleep!

How many garments have you made?
Uhmm, countless? My wardrobe is 90% handmade. I make what I need, from t-shirts and jeans for working in the garden to evening wear and everything in between. Never a dull moment!

Is your sewing room chaotic or always tidy?
Don't be fooled by the pictures! When I'm busy it always becomes a disaster area with me slaloming between the piles. But as soon as I finish a project, I put everything back where it belongs and clean the room. And then there's that magical moment, sitting at a completely empty sewing table. Time for the next plan!


—————————————————————————————————————————-


Friday 7 February 2020

The sleeves of my dreams


Sleepwear with statement sleeves? Yes please!

Several years ago I discovered the fun of sewing my own sleepwear and I find it extremely rewarding. It's the part of my wardrobe that I wear 30% of the time, and the first thing I see in the mirror when I get up. Once I started looking at sleepwear as a serious part of my wardrobe it made sense to incorporate my favourite colours, prints and style elements and create a comfortable and pretty nighttime collection. And bonus: it's a nice way to try new silhouettes, like in this case a t-shirt dress.


Ottobre 5/2018

The pattern is from Ottobre magazine 5/2018 and comes in a dress and sweatshirt version.


The fabric is a beefy cotton double knit. I used the wider stripes for the bodice and sleeves and the smaller stripes for the cuffs and the bands. I made size 48 and lengthened the bodice (5 cm/2 inches) as Ottobre patterns are drafted for a height of 168 cm/5'6'' and I'm 173 cm / 5'8''. Next time I'll go down a size as the shoulders are a bit roomy.


I love the sleeves. There's a little shoulder dart and the pleats start just above the elbow. Of course the cuffs keep all that extra fabric in place, much appreciated when brushing teeth or making breakfast. The overall style is a bit too sporty for my taste for daytime wear, although with a few changes like a v-neck it might work as a sweater. I couldn't be happier with the colour, it's a perfect match with the kimono style robe that I made in 2018.


Simplicity 1563

I'm not as brave this time so a few barefoot bedtime shots will have to do!


Show those sleeves!


Now I'm off to organise a birthday party for my creative photographer, aka mr Foxgloves.

Happy weekend!


Friday 31 January 2020

A silk Burdastyle blouse


This blouse started out as a multi-purpose experiment. I wanted to check the fit of Burda patterns on my ever changing shape and I wanted to work with a variety of fabrics to get to know my new sewing machine, a Bernina 570QE. Slippery striped silk gave me the opportunity to test the built in dual feed vs the walking foot and I figured twelve buttons would give me plenty of practice in the buttonhole department as well.


The pattern is Burdastyle 11/2016-131, with shoulder princess seams, puffy sleeves and cut-on ties. The fabric is silk that I bought for a steal, in fact is was cheaper than muslin fabric so I bought plenty of it and put half of it in the washing machine. There was no visible difference between new and washed fabric. Good to know I won't be sponsoring the dry cleaner by making this garment!

I cut the side panels and the cuffs on the bias, just for the fun of it.


The front was cut on the straight grain, but as you can see in the cutting layout that meant the ties ended up on a weird angle with the stripes in a rather non-distinct direction. So I cut off the pattern pieces for the ties at center front and recut them on the straight grain. This created a tiny seam which completely disappears in the knot.


Stripe matching on the side seams was partly successful, due to the fact that not all stripes had the same width. Very noticeable in close-up, not so much from a distance. The dual feed worked nicely and I really enjoyed playing with the adjustable presser foot pressure.


Sewing the buttonholes was fast and easy, although it was challenging to find the right type of interfacing. Firm enough to keep things straight, but not too much or it would interfere with the drape of this very lightweight fabric.


The insides, with covered shoulder pads.


Burdastyle 11/2016-131


Sorry for the sad bathroom pictures but the weather is dull and grey and I want to get rid of that long list of unblogged projects. So, what's the verdict? Well, I was pleasantly surprised by the fit of this wearable muslin. These pictures were taken after a festive dinner and there is some wrinkling going on, making it hard to judge whether I could take out a bit of fabric in the upper bust, but I think I will next time.


This blouse is a lovely addition to my wardrobe, both on its own and as a layering piece with a navy suit.

Now does anyone know what type of silk this is? The seller had no clue and I hadn't worked with a similar fabric before. The blouse feels crisp and almost weightless. The silk has a subtle sheen, is easy to work with and presses well. It has slubs in the weave, but not as much as silk dupioni. I have a few yards left and I would like to label it correctly.

Wishing you all a happy weekend with plenty of sewing time!


Sunday 5 January 2020

Reflections and plans for 2020


Don't you love the tradition of looking back on the sewing year that just came to an end? So let's dive into my best 5 makes, my top 5 misses, and.....o, wait. Who am I fooling? I only documented the grand total of 5 garments here in 2019!
The picture above shows what I added to my winter wardrobe, a Knipmode sweatshirt and a Knipmode designer dress. Both big hits and often worn.


And here's my summer output: a Zadie jumpsuit, a summer version of the Blackwood cardigan and a Burdastyle top. Again all incredibly popular wardrobe additions!

And, although a bit silly given the numbers, the annual pie chart sorted by pattern company.


On the upside I can celebrate a 100% success rate, but what happened to all those plans?? 
In short: life. 

As you may remember I started the year with an improved sewing room layout, a sorted stash and a new sewing machine. I was not very satisfied with my sewing in 2018 and wanted to make more adventurous choices. And I did! A year ago I could not have imagined sewing a jumpsuit and actually LIKING it. Both the plaid dress and floral top are new to me styles as I have been experimenting with different shapes.

The sewing room layout worked like a dream and after some cursing and threats to throw the new machine out of the window we became best friends. We bonded over working with many different fabrics. I sewed with sustainable fabrics from Enschede Textielstad, made a silk blouse, a linen jacket, cozy sleepwear in double knit jersey, experimented with decorative stitches and am now working on a boiled wool winter coat. My new Bernina passed every test with flying colours!

So I did in fact sew more than I showed here. But if it isn't recorded on the blog, it didn't happen.

Last year wasn't the best of years for me health wise. It's one thing to be sewing when on antibiotics or painkillers, but posing for blog pictures is something else. So one of my plans for 2020 is to deal with this this back log as soon as I can and have all my sewing notes up here, well documented and in a safe place. Those sticky notes in various notebooks drive me crazy! I hope the weather will be cooperative to take decent blog pics, and if not I do have some indoor action shots of a few of those garments that will have to do.

Of course I have a long list of sewing plans. (And too much fabric, as you didn't think I only bought fabric for five lousy projects, right?) First I'm going to pick up where I left a month ago with my winter coat. I made a muslin, altered the pattern where needed, cut all three layers and basted fashion fabric and underlining together. Somewhere in the mess that is my sewing room there must be a pile of lining pieces waiting to be marked....


When my coat is finished I hope to fill a few wardrobe gaps. I could use some summer dresses, tops, pants and sleepwear and I have a lovely fabric waiting to become a spring coat. I'll keep working on improving my sewing skills, both online in the Susan Khalje Couture Sewing Club and in real life as one of my birthday gifts is a workshop with a tailor. I'm really looking forward to that.

Here's to a wonderful and creative new sewing decade where we make all our sewing dreams come true!


Monday 30 September 2019

The last summer sewing: a Burdastyle top


We have been spoiled with a few glorious September weekends, pushing all thoughts of autumn sewing aside. So, just before putting my summer clothes and sandals away, I'd like to share one last breezy summer top I've made.

The pattern is from the Burda plusmagazine, spring/summer 2019. It's a very good one in my opinion. For this edition the designer collaborated with a German Plus size model who specifically asked not to hide but to highlight her curves. The result is a very nice and balanced collection of tops, pants, skirts, dresses, jackets and a jumpsuit.


When I was younger I never had much success with Burda patterns. Burda drafted for a shorter and straighter shape than mine and Knipmode was a much better fit for my tall hourglass shape. Well, surprise! Since my waistline left the building I secretly morphed into a Burdagirl. The loose fitting top I'm modelling here may not be the most convincing example but I've made a few Burda blouses and a jacket for further proof. And of course that leopard dress from this magazine cover is high on my list as well!


Burdaplus ss/2019, pattern 401

Pretty sleeves, and a winning shoulder line that showed some skin without showing bra straps. During a trip to Rotterdam I found a lovely cotton voile in my favourite fabric shop: Schroder Modestoffen.


For the shoulders and sleeves I cut size 46 and went up a size for the bodice. In hindsight I don't think going up was necessary but I decided to leave it as I didn't feel like undoing all those tiny French seams.

Changes I've made: I self lined the flounces for a neater look. Obviously one cannot inspect one's plums without showing the insides of said flounces.


Also: Burda tells you to use grosgrain ribbon for the shoulder straps. It worked well for the striped sample but for my floral print I preferred  matching straps. I finished the top, including the elastics on the top of the sleeves and then, with the help of mr Foxgloves, decided on the placement and length of the straps.


As you can see below the front and back of this top look confusingly similar. The only difference being the darts, which are pretty invisible against this busy print.


To make early morning dressing a little easier I added a row of decorative stitches to the back facing.


Pretty and effective. I'm so sorry to see this top go into hibernation. 

I'm just terrible at sewing for a different season than the one we're in. This morning I got a little worried, knowing that I most definitely need a new winter coat. Better start planning!

Tuesday 20 August 2019

A Blackwood cardigan with 3/4 sleeves


One day I woke up with the urge to sew something yellow. Don't ask me why, as I hadn't worn yellow in ages, but I'm glad I listened to that inner voice.


This sight made me smile everytime I entered my sewing room.

The only fabric I could find in a shade that worked for me was a lightweight cotton jersey. So the fabric determined what I would make: Blackwood cardigan #5.


Blackwood cardigan by Helen's Closet

I started with big plans. The long version with trumpet sleeves, or ruffles? When I draped myself in the fabric the amount of yellow was ... overwhelming, so I decided to make the shorter version. Statement sleeves were still an option. 

I had made the shorter version twice before and did not like how the horizontal line of the wide bottom band hit me at the high hip. So the first change I made was cut the bottom band the same width as the front bands. Then I added the difference to the length of front and back bodice so the overall length stayed the same.

For the sleeves I experimented with a half circle flounce, a pleated band and a gathered ruffle, all starting just below the elbow. None of it worked. The Blackwood has rather strong and clean style lines with those parallel front bands and the 90 degrees angle with the hem band. Just doesn't blend well with a softer sleeve finish. So I made the next logical change and cut sleeve bands that had the same width as the other bands. And all of a sudden it looked like a balanced hack!


I've shared most of my thoughts about this pattern in earlier posts (Blackwood 1&2#3#4) and I like how they all look so different. This summer edition gets tons of wear. The short sleeves are very practical in the kitchen and in the garden (see top picture). Instead of a static photo shoot I'll end with a few action shots of this new favourite.  


During a city trip, with a sleeveless Ottobre top and Cashmerette Ames Jeans.


Enjoying music and Mexican food at a bluegrass festival


And in the sewing room, celebrating the first anniversary of Sewover50.

Speaking of the Sewover50 birthday, a small group of sewists was interviewed by Susan Young and I was one of them. You can read the interview here if you're interested.

That's it for now. My head is spinning with sewing plans and summer is coming back at the end of this week. No fall sewing for me yet!

Till later!

Sunday 11 August 2019

Back with a Zadie jumpsuit!


Hi! It's been a while! In my previous post I was standing in the snow having zero intention of putting this blog on halt for over six months. But then a string of unrelated medical issues interfered with my plans. I kept sewing, but it's not hard to imagine that when you're on a diet of painkillers and antibiotics taking selfies is not high on the list. I'm as good as new now and happy to be back!

At the beginning of the year I promised myself to make 2019 more adventurous sewing wise. Ah, little did I know... Well, I did manage to make a few unexpected choices in recent months. Who knew I'd want to sew a jumpsuit? I checked, and the last time I did was in 1982!


I think it was the wrap that got me interested in the Zadie Jumpsuit by Paper Theory. My wrap dresses are firm favourites, so why not try something related?
My measurements put me in a size 20 and I decided to make a quick toile.


Uhm, no. Unfinished and unpressed, as I was about to throw it in the bin at this stage. I decided to give mr Foxgloves a good laugh first but much to my surprise he saw the potential of this garment. The verdict: overall too big, fabric on the heavy side and 'weird spoilers' above the bust. All excellent observations!

I decided to go down a size, do a small FBA and add darts. I found the fabric of my dreams during a trip to Rotterdam. It's a drapy rayon from Schroder modestoffen.


Apart from the FBA / bust darts I made a few other changes. I used lightweight interfacing to give the ties a crisp look and angled the ends. I also changed the finished width of the ties from 3 to 4.5 cm for better proportions and lengthened them by 10 cm.


Sizing down was a good call, and perhaps I could have gone down another size. Hard to tell with these loose fitting styles. When does a wide leg turn into a too wide leg?

Despite the FBA and bust darts there is still some folding above the bust. Probably inevitable with cut on sleeves on my busty frame. The folds disappear when I move my arms and I did not want to over fit. Same goes for the crotch length. The crotch felt a little low at first, but a trial run to the supermarket proved the extra length is much appreciated when bending over or reaching for high shelves.


There's one thing I will change for a next version. My front waist seam ended up a little too low as a result of the FBA. The ties automatically sit at my true waist and the waist seam does not. (Back waist seam is fine) For the time being I'm okay with that. Taking out any length will make wiggling into this jumpsuit even harder than it already is. (One of my medical issues was an acute hernia so my acrobatic skills aren't top notch at the moment)

I'm very happy with this style experiment! I'm considering making a navy version for autumn. Perhaps turn the pleats into darts and change the bias tape finish for a facing to create a slightly more formal look.


But now it's harvest time Chez Foxgloves! Apples, plums, raspberries. All kinds of cooking, baking and freezing going on. Till next time!