Pages

Showing posts with label KnipmodeChallenge2017. Show all posts

Friday, 8 December 2017

How wedding dress alterations led to experiments with a Knipmode dress pattern


Back in August I got an emergency phone call from a friend. "Do you know anything about overlockers?", she asked. There was a hint of panic in her voice. I went over to her place and found her struggling with an enormous cloud of lace, satin and organza. She had promised months ago to hem her daughter's wedding dress and procrastinated doing so till four days before the wedding. And then her overlocker refused to do a rolled hem. We spent the evening reading manuals, changing settings and trying different needles but nothing worked. When it was way past bedtime I took some offcuts of the dress home to see if my machine could do the trick.
The next evening I was again reading a manual and looking at settings because I had never before used the rolled hem function. What a relief when good old Bernie produced a lovely, wavy, tiny rolled hem. I cleaned my sewing room because it was still covered in blue fluff from a previous project. I also like to write little reminders on my sewing table. Somehow I didn't think the bride would be overjoyed when finding my topstitching notes printed over her skirt!

The next morning the bride and her mom came over with the dress. We improvised a little stand so we could do a final check of the length and started threading my overlocker with the right colour Gutermann threads. Fail!
Pressure? What pressure? (Two days to go till the wedding)
At this point I should mention that the bride is one of the most laid back persons you'll ever meet. I've known her from the day she was born and she has always been very relaxed. Even now. While her mother and I were stressing she was cheering us up. "Don't worry! We can always cut it and use clear nail polish to seal the hem", she suggested. Or pinking shears. Shiver! We took a deep breath, had more coffee (was it really too early for wine?) and threaded the overlocker again. And it worked!

MOB's victory moment

The bride looked gorgeous on her wedding day so there's the happy ending!

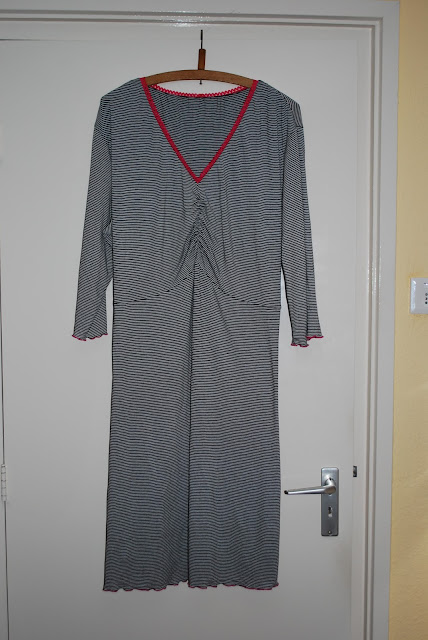
After the wedding I returned to a spic and span sewing room and rolled hems were still on my mind. Now that I had learned a new trick I wanted to use it again. And then there was also that ongoing mission to tackle the fit of the Knipmode block. To kill two birds with one stone I took a length of black and white striped jersey that was earmarked to become a nightie and a Knipmode knit dress pattern.

KM1712-07

This pattern from the December 2017 magazine had made an earlier appearance in the October 2017 supplement. In fact this garment was made before I started sewing my birthday dress and it turned out to be a rather useful pre-toile.


Instead of a neckband I used pink lingerie elastic, leftovers from another nightgown.


And of course, rolled hems....


That was fun! What about the fit? Well, it was too big. I could go down a size at the shoulders, the sleeves were too wide and it was a tad too long. If I had made this as a dress I would call it a wadder, but for sleepwear it is quite okay. Oversized but comfortable.
All in all it was a useful exercise that gave me a better idea where to start with Knipmode knit dress patterns.

Of course I owe you a picture of me wearing the actual thing. Since it's snowing outside this rather awkward indoor selfie will have to do. Barefoot in the sewing room, surrounded by a minefield of pins. Living dangerously for the sake of sewing science!


Next up: a kimono, to wear as a robe. I'm freezing!

Tuesday, 21 November 2017

Velvet Knipmode designer birthday dress


When you're celebrating a significant birthday you need a new dress, right? And when you're going to spend your birthday in a castle it needs to be a posh dress!

After going through my pattern collection I decided this was the perfect occasion for one of the Knipmode designer dresses by Dutch designer Janice. It's from the October 2017 magazine, #26


KM 1710-26


I chose a matte stretch velvet in a deep shade of emerald. The colour is very hard to capture and it doesn't help that most pictures were taken by candlelight. Although the pictures are a bit blurry, I hope their festive character will make up for that!


In the wine cellar

Now let's talk about construction details first before all that wine will distract us. Over the last few months I've been struggling with the fit of the Knipmode bodice block. Although I was making progress, I was not ready to cut that pretty velvet without making a toile first.

When I was looking for fabrics with a similar amount of stretch I found a loud mix that resulted in a Pippi Longstocking / Ikea employee type of dress.


On second thoughts, I probably would have been arrested for indecent dressing when entering Ikea in this prototype. That neckline was scarily deep! I raised the neckline (4 cm), thus creating a cheater FBA by adding length where it was needed.
 The rest of the dress was fine once I did my usual  adjustments: taking out 2 cm at the neck base and correcting the hip curve. Knipmode patterns are drafted for a X-shape while I'm 8-shaped with a higher hip curve. I shave a bit off at the lower hip and the same amount to the high hip. This is such a standard procedure I'm thinking of creating a cardboard hip curve template.
One other thing I should mention is that, although the line drawing suggests otherwise, the pattern has no darts in the back bodice. The center back seam provides subtle shaping, resulting in a nice overall fit.

Since I hadn't been sewing stretch velvet in ages I did a few test runs to decide on the finishes. The biggest challenge was formed by the front neckline. Instructions told to just foldover and stitch down, but to be on the safe side I added fusible seam tape first.


After fusing and topstitching I measured both bodice pieces against the pattern. No stretching had occurred so all was good! The skirt has three diagonal pleats, the bodice two. The lower bodice pleat is folded over the waist seam before the side seam is stitched.


When I put on the dress to decide on the length I found the skirt too straight to my liking and I tapered it to obtain more of a pencil shape, taking out a total of 10 cm of the circumference. I catch stitched the hems because I prefer the clean look over a twin needle or coverstitch finish.

I'm really happy with how this dress turned out and I will most likely make this pattern again.

I'll add some extra pictures, just because....partydress in action! I had the most wonderful time celebrating my 60th birthday with our family. Excellent company, great food, ample wine and whisky. All that, and a dress that was made to party!


Presents!


With the knight in shining armor

And with the real deal 💘


Bring on the next decade. Cheers!


Tuesday, 28 February 2017

Finished faux collar


Recently my oldest daughter told me she was looking for a faux collar, or half shirt, dickey, hoaxer or whatever you'd like to call it. She sent me an inspiration picture of these cute collars, made by the Dutch brand Idiot du Village.


 Knipmode December 2016 happened to have a mix & match blouse pattern, one of the views being this gem:


DD1 is living 1,5 hours away from me and has a very busy schedule so fitting sessions can be hard to arrange. For this pattern I didn't foresee any issues so I just guessed her size and added 3 cm to the length as she's 1.82 cm / 6' tall. I knew she wanted to wear the collar under a slim fit rayon top (not the one pictured above) so I chose a cotton batiste. The bodice is self lined for a clean finish. To keep it light and soft I used silk organza as interfacing for the collar, collar stand and button band.


If I'd make this again I would probably change the separate button bands for a cut on facing for an even smoother effect.


I think next time I could go down a size to 36. I would also add a few centimeters to the the shoulder width now that I've seen it in action while worn with a chunky sweater with a wider v-neck. Check the little gap on the right:


It was a fun project to make and the pattern went together well.
KnipmodeChallenge2017: 2 down, 10 to go!

To continue this selfless sewing story: back in January I posted a picture on Instagram of a silk organza pressing cloth I made for myself to replace the one I had accidentally cut up. To prevent further klutz action I serged it with hot pink thread for easy identification. Much to my surprise I saw a message from my daughter in the comments, hinting that she would love to get a similar one as a birthday present. She doesn't have a dedicated sewing space so I made a little zipper bag to store it near her ironing board.


It was my very first time using a rotary cutter and I was trying so hard not to hurt myself in the process that I completely forgot to take pictures. (I'm not sold on the scary tool)

Luckily thanks to daughter's boyfriend we have the birthday pictures and a few very artistic shots of the project!


Don't you love the matching tulips?


Tuesday, 7 February 2017

Finished winter coat!


Hi all! Can you tell I'm pretty pleased with my new winter coat?


In my previous posts about fabric, pattern and design choices and inner structure I've discussed about everything worth mentioning about this project so this post will be rather picture heavy, ending with a round up of the changes I've made to the pattern (Knipmode 10/2016-104)


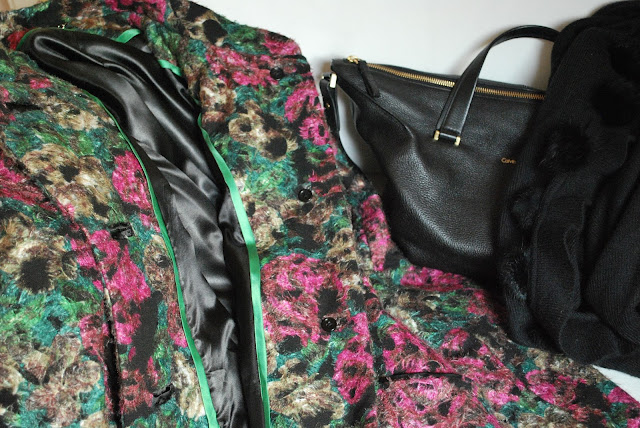
After sewing on the buttons, anchored by small buttons on the inside, I pulled a satin tape through the buttons that matches the satin used for the piping and bound buttonholes.


The inserts on the back are purely decorative, on the front they are hiding pockets that are deep enough to carry my phone, keys, coins, dog treats and other miscellanous stuff that mysteriously ends up in there.


A peek of the insides, right before the final press. This coat is very easy to accessorize!
I added extra length to make it more versatile. Can be worn with both pants and dresses.


Soft and cosy on the outside, a warm layer in between and a shiny satin lining. Coat love!

Things I've changed to the design
- Omitted the zipper
- Added overlap and underlap at centre front
- Redrafted the collar
- Four bound buttonholes
- Added flat piping to the design lines at front and back
- Added flat piping (green satin) between facings and lining
- Added a hanging chain

Construction changes
- Added underlining
- Added chest plates and shoulder pieces
- Added a back stay
- Reinforced the insert corners
- Added silk organza to the collar

Fit changes
- Added 12 cm to the bodice
- Added 3 cm to the sleeves

Final thoughts: I really enjoyed sewing this coat. The fabric looks prettier in real life, the colours are much deeper. My camera had a hard time focusing on the dazzle print and some pictures are over exposed to show the details. A lovely print to work with on dull and grey winter days!

I was after a coat with a relaxed fit, without being oversized. One of my other winter coats is very fitted in the shoulders. Although I love that look, it's impossible to wear a jacket underneath. My new coat fits well over chunky sweaters and structured jackets, without having dropped shoulders or raglan sleeves. Win!

The only changes I've made regarding the fit were length adjustments. I like my sleeves slightly longer to keep my wrists warm while cycling. I'll do some test runs, maybe I'll end up shortening them by 1 cm.

So, that's one down for the #KnipmodeChallenge2017!


Wednesday, 4 January 2017

Knipmode Challenge 2017


Happy New Year to you all!

A few years ago I embraced the 'no rules'-policy for my sewing. Rules, restrictions and deadlines are part of my working life. Sewing is my creative outlet and my creativity thrives on freedom and flexibility. Guilt free fabric buying and stress free sewing was my new motto!

Little changes made my sewing life happier. No more rushing to finish a dress meant significantly less last minute drama. Sometimes a little flip-thinking was required: that Christmas dress wasn't finished four weeks late, it was eleven months early for next Christmas!

The downside of sewing at this very relaxed pace was of course the lower output. Last year I made 7 tops, 3 dresses, 1 jacket, 1 nightie and a skirt (not all blogged)


Top favourites were my Butterfly Cashmerette Upton dress for summer and the Vogue 1465 Donna Karan jacket for autumn and winter.

After three consecutive years of peaceful, slow sewing I feel it's time to find a new balance or else I might sew myself to sleep one of these days.
I noticed a few wardrobe gaps that really need to be filled, all the more reason to make a plan in order to increase my output. I still don't like sewing deadlines and it's highly unlikely I'll ever enter a sewing competion, or even a SWAP, but perhaps I could benefit from setting a few soft goals.

Just I was contemplating possible new goals I saw the announcement of Burda Challenge 2017 on the Pattern Review forum. First rule: no rules! Just use those magazines!
Interesting! The no rules-rule almost made me join instantly. Then I remembered just in time that 98% of my massive magazine archive is filled with Knipmode magazines.
Why not set myself a similar challenge?  A Knipmode Challenge 2017?

It's not that I want to turn this blog into Knipmode-only, far from that. There will always be new and shiny patterns to distract me and I love my growing collection of Vogue designer patterns way too much to set them aside. Not to mention that Chanel jacket that still needs to be finished. But as you could see in my previous post there are serious gems in that pattern collection that really deserve better than to end up in a pile of unused magazines. That stack in the top picture is only the tip of the iceberg!

Over the last few years I've enjoyed seeing Knipmode patterns being sewn in about every corner of the world.  I hope other Knipmode lovers will join me in this challenge. Surely I can't be the only one who thinks it's so inspirational to see these patterns on women with different shapes and sizes!

So without pinning myself down on fixed numbers (freedom & flexibility!) I'll use my Knipmode magazines and pdf patterns more often. I'll strive to make at least one pattern each month, either from the latest issue or the archives.  I'll share what I make here on the blog, on Instagram (@foxglovesandthimbles) and on Flickr, using the tag #KnipmodeChallenge2017

Please let me know if you'd like to join!